Showing posts with label Tutorial Photoshop. Show all posts
How to Design Your Own Wallpaper Using Photoshop
On occasion this time I will show how to design a desktop
wallpaper for a little more unique. Maybe some people prefer to download their
own favorite wallpapers to be used as computer wallpaper. Lots of free
wallpaper website provider includes:
- coolwallpapers.org
- yourwallpaper.com
- best-wallpapers.com
- wallpaper4computer.com
But today we will be a little play with the professional
program must be owned by a Designer. Yap, photoshop. For this tutorial I'm
using Photoshop CS3. For those who do not have please download it here.
To shorten the time, follows these steps:
1. Previously, you had to know in advance the size of the
resolution of the computer being used. Right-click on the desktop screen
(background). for XP: properties> settings. Look at the screen resolution,
in this case I use a resolution of 1366x768 pixels.
2. Out of the page resolution, then the desktop screen,
press [PrtSc] / print screen on your keyboard to copy the desktop screen.
3. Open your Photoshop program. Then press Ctrl + N on the
keyboard set as follows:
4. Klik ok, then press Ctrl + V at keyboard. You will see your wallpaper at worksheet.
5. In the layer at right side, there are background and layer1. Click icon Create a new layer like this to add a new layer.
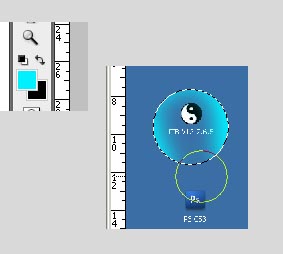
6. Choose eliptical marquee tool at toolbar at left side then make a circle at your icon with hold [shift] at keyboard to keep it circle like this.
7. Choose brush tool at toolbar then at brush option set Master Diameter : 100, Hardness : 0%
8. Now, choose your own color then use brush tool at selection like this
9. Use your imagination until it like a bubble :D and Ctrl+Z if u make any mistake, then Ctrl+D to remove selection. Now u have finished your bubble. Hold Alt at keyboard u will see two cursor black and white then drag n drop bubble to another icon like this. You will see duplicate bubble.
10. If you have finished, then add a new layer by select layer 1 and do same as point 5.
11. then at menu choose File > Place > (choose your picture) then ok, if u like to add more picture as background. then transform it and press enter to finish it.
12. Next, Ctrl+Shift+S to save as your wallpaper. Choose jpeg then save. At jpeg option click OK.
13. At last, Choose your picture, doble click. while open, right click and set as desktop background.
14. See your desktop and Taaraa.... :D. if you cant move your icon, try to remove check at this
15. This is my wallpaper that i'm using until now :D
Hope u enjoy, dont forget to leave a comment if you have a trouble :D..tx
5. In the layer at right side, there are background and layer1. Click icon Create a new layer like this to add a new layer.
6. Choose eliptical marquee tool at toolbar at left side then make a circle at your icon with hold [shift] at keyboard to keep it circle like this.
7. Choose brush tool at toolbar then at brush option set Master Diameter : 100, Hardness : 0%
8. Now, choose your own color then use brush tool at selection like this
10. If you have finished, then add a new layer by select layer 1 and do same as point 5.
11. then at menu choose File > Place > (choose your picture) then ok, if u like to add more picture as background. then transform it and press enter to finish it.
12. Next, Ctrl+Shift+S to save as your wallpaper. Choose jpeg then save. At jpeg option click OK.
13. At last, Choose your picture, doble click. while open, right click and set as desktop background.
15. This is my wallpaper that i'm using until now :D
Hope u enjoy, dont forget to leave a comment if you have a trouble :D..tx
Fast Steps To Create Starbust Rainbow Wallpaper
Hello guys, today i will show you about how to make simple starbust rainbow wallpaper with fast steps :D Many people know about rainbow. It has many color. I like it while i was child. And i had problem to remember its colors. Just short story hehe...
Lets see the tutorial, are you ready :D :
1. First, open your program (i'm using Photoshop CS3), make a new file at File > New or Ctrl + N at your program and set like this :
Lets see the tutorial, are you ready :D :
1. First, open your program (i'm using Photoshop CS3), make a new file at File > New or Ctrl + N at your program and set like this :
2. Remove the lock icon at layer by click twice then ok. See the picture :
3. Press G at keyboard to choose gradient tool and at gradient properties click down arrow beside gradient color and follow this instruction.
4. Now, at your workspace, try drag n drop your gradient tool like this and you will see a rainbow color (hold shift to make horizontal line):
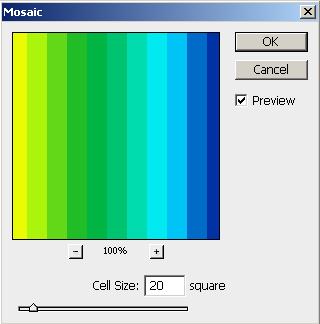
5. Go to Filter > Pixelate > Mozaic and set cell size to 20 :
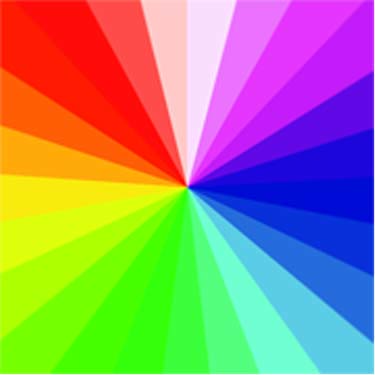
6. Last step, go to Filter > Distort > Polar Coordinates > OK
7. U have finished your design, You can add more effect Filter > Distort > Twirl to see another rainbow :D
Its simple tutorial right :D Try develop your skill with my another tutorial here tx before :D
4. Now, at your workspace, try drag n drop your gradient tool like this and you will see a rainbow color (hold shift to make horizontal line):
6. Last step, go to Filter > Distort > Polar Coordinates > OK
7. U have finished your design, You can add more effect Filter > Distort > Twirl to see another rainbow :D
Its simple tutorial right :D Try develop your skill with my another tutorial here tx before :D