Tutorial Design Your Stamp Using Freehand

Articel previously is about how to design your wallpaper using photoshop. Today i will tell you about make a stamp, ups not make just design a stamp using vector program Macromedia Freehand 11. If you don't have, you need to click this link before you read this tutorial.


Lets having fun with it :
1. Open your freehand program
2. Ctrl + N at keyboard to make a new file
3. Press O at keyboard to make a circle like this (hold shift if u want to make a good circle)
4. Press V to change your kursor to pointer, then press Ctrl+Shift+D to duplicate object.
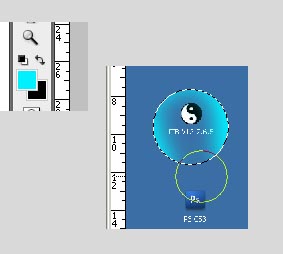
5. With hold Alt+Shift drag  the little blue sign at right up corner and drop into first cirle like this

6. Repeat step above to make another one until you have 3 circle with different size.

7. Use Alt+Space then click to enlarge and Alt+Shift+Space to minimize worksheet (This trick same as photoshop). Then make a Rectangle by press R at keyboard like this


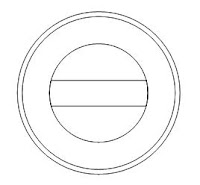
8. Then duplicate the 3rd circle by press Ctrl+Shift+D then hold shift at keyboard then select 3rd circle and rectangle. While selected at menu bar choose Modify > Combine > Crop until like this


9. Duplicate 3rd circle then right click at 3rd circle. then follow instruction at image above.


10. Type your text whatever you like :D, then click at blank area to finish it. you will see that the text is not tidy. Select the text with pointer (V) then Press Ctrl+M to visible a Align and Transform menu then choose this


11. Set Scale% 101 to enlarge the circle and 99 to minimize it. Click Scale button at corner continuously and  set like this
12. Select text and press Ctrl+Shift+> to set the size and Ctrl+Shift+< for otherwise. then we will make a star. By double click the polygon tool and set like this then ok.


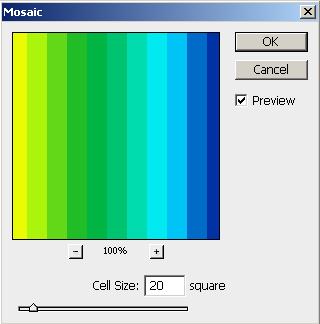
13. Draw it by hold shift and then fill it with fill tool (under pencil icon at toolbar) choose the color and set like this


14. Press T to add a text to the rectangle and Tara.. this is the final result with some colors:D Ctrl+Shift+R to  ekspor your picture as jpeg


Practice, practice and practice and you will be good designer like me :D hehe.. (kidding). Prepare yourself for the next tutorial, see you..

Designer Sunglasses? What do you think?


Most people use sunglasses to protect their eyes from the sun, but they are also considered a very important fashion accessory. Much like glasses you get for your eyesight, you want to find a pair that looks good with the shape of your face. There are many great styles of designer sunglasses out there, but you should never buy without a mirror and some time to try on as many as you need until you find the ones that look the best on you. If the ones you have chosen are really great, and probably popular, they aren’t going to look good on you unless they fit your face.


Taking the time to choose the right ones is even more important when you buy designer sunglasses. They always cost more than the random ones you might find in a store display, and that means making the wrong choice can be costly. If you get them home and decide that you don’t like the way they look, you are not going to wear them. You may be able to take designer sunglasses back for a refund, but you can never count on that. Instead, make sure they are right before you buy.

When you are buying designer sunglasses, you have even more to think about than how they look on your face. You have to think about they type of protection they are offering you. If you wear contacts, your eyes are going to be bothered by sunlight even more so than those who do not wear them. This means you want extra protection. Just make sure they are not so dark that you can’t see what you are doing. If you drive quite often, that is a huge consideration.

Also make sure the designer sunglasses that you buy fit on your head well, and can be moved around easily. If you think you are going to push them up on your head quite often, try it out to see how it goes. Some are made so they are snug on the face, but when you push them up, they get tangled in the hair. If you do this a lot, and have longer hair, you are going to end up hating your sunglasses. Choose a pair that are easy to maneuver, even if they are not your first choice. When you put all of those considerations together, you can be sure the money you just spent on designer sunglasses was worth the price.

Awesome Celtic Tattoos Design

Nowadays, Celtic symbols are extremely popular as tattoo designs, and it is no wonder why. Celtic design tattoos are some of the most beautiful and ornamental decorations you can get on your body. They involve elaborate in knots and curves, interlocking rings, and other appealing and attractive patterns. Many of these Celtic symbols have much deeper meaning, but you can appreciate the tattoos whether or not you are aware of that. They are valuable for their aesthetic beauty even without the added depth of symbolic meaning.


My first exposure to Celtic design tattoos was actually through a friend of mine who was enrolled in a mythology class at the time. She became obsessed with Celtic knots, and began to sketch them in her notebooks in her spare time. When I came across one of her sketches, I was surprised by how beautiful it was. I had never really seen anything like it before. I asked her about it, and she told me that it was actually an ancient Celtic pattern that was discovered in Britain some time ago. When she told me that she was going to have one made into a Celtic designs tattoo, I was naturally intrigued, and I asked if I could go with her into the tattoo parlor.

When I went into the studio, I was in for a further surprise. Apparently, Celtic design tattoos were quite popular. I look at the tattoo book, and saw hundreds of tattoos that had a similar look to the one she had. It seemed to comprise almost half of the work that the tattoo artist did. Nowadays, I know that that was just his personal interest. Different tattoo artists tend to have different specialties, and that was what he was into. Nonetheless, it did provide me with an idea of how popular Celtic patterns have become.

One of the best things about Celtic design tattoos is that they always look good. When you first get them and they have a black or dark green look to them, they are quite attractive, but as they fade they retain their beauty. That greenish color that is so characteristic of old tattoos looks excellent with Celtic knots. Even better, they are easy to touch up. Almost every tattoo artist in the world knows how to make Celtic tattoo designs, So you can find an artist who will do touch up work on one in practically any studio.

How to Design Your Own Wallpaper Using Photoshop

On occasion this time I will show how to design a desktop wallpaper for a little more unique. Maybe some people prefer to download their own favorite wallpapers to be used as computer wallpaper. Lots of free wallpaper website provider includes:
  1. coolwallpapers.org
  2. yourwallpaper.com
  3. best-wallpapers.com
  4. wallpaper4computer.com
But today we will be a little play with the professional program must be owned by a Designer. Yap, photoshop. For this tutorial I'm using Photoshop CS3. For those who do not have please download it here.

To shorten the time, follows these steps:

1. Previously, you had to know in advance the size of the resolution of the computer being used. Right-click on the desktop screen (background). for XP: properties> settings. Look at the screen resolution, in this case I use a resolution of 1366x768 pixels.

2. Out of the page resolution, then the desktop screen, press [PrtSc] / print screen on your keyboard to copy the desktop screen.

3. Open your Photoshop program. Then press Ctrl + N on the keyboard set as follows:


4. Klik ok, then press Ctrl + V at keyboard. You will see your wallpaper at worksheet.

5. In the layer at right side, there are background and layer1. Click icon Create a new layer like this to add a new layer.

6. Choose eliptical marquee tool at toolbar at left side then make a circle at your icon with hold [shift] at keyboard to keep it circle like this.


7. Choose brush tool at toolbar then at brush option set Master Diameter : 100, Hardness : 0%


8. Now, choose your own color then use brush tool at selection like this


9. Use your imagination until it like a bubble :D and Ctrl+Z if u make any mistake, then Ctrl+D to remove selection. Now u have finished your bubble. Hold Alt at keyboard u will see two cursor black and white then drag n drop bubble to another icon like this. You will see duplicate bubble.

10. If you have finished, then add a new layer by select layer 1 and do same as point 5.

11. then at menu choose File > Place > (choose your picture) then ok, if u like to add more picture as background. then transform it and press enter to finish it.


12. Next, Ctrl+Shift+S to save as your wallpaper. Choose jpeg then save. At jpeg option click OK.


13. At last, Choose your picture, doble click. while open, right click and set as desktop background.


14. See your desktop and Taaraa.... :D. if you cant move your icon, try to remove check at this


15. This is my wallpaper that i'm using until now :D


Hope u enjoy, dont forget to leave a comment if you have a trouble :D..tx

Fast Steps To Create Starbust Rainbow Wallpaper

Hello guys, today i will show you about how to make simple starbust rainbow wallpaper with fast steps :D Many people know about rainbow. It has many color. I like it while i was child. And i had problem to remember its colors. Just short story hehe...


Lets see the tutorial, are you ready :D :
1. First, open your program (i'm using Photoshop CS3), make a new file at File > New or Ctrl + N at your program and set like this :


2. Remove the lock icon at layer by click twice then ok. See the picture :


3. Press G at keyboard to choose gradient tool and at gradient properties click down arrow beside gradient color and follow this instruction.


4. Now, at your workspace, try drag n drop your gradient tool like this and you will see a rainbow color (hold shift to make horizontal line):


5. Go to Filter > Pixelate > Mozaic and set cell size to 20 :


6. Last step, go to Filter > Distort > Polar Coordinates > OK

7. U have finished your design, You can add more effect Filter > Distort > Twirl to see another rainbow :D


Its simple tutorial right :D Try develop your skill with my another tutorial here tx before :D